Google Meet vs. Zoom vs. Microsoft Teams Which one to choose?
Unlocking Gmail’s Potential: A Step-by-Step Guide
- Introduction
- Expanding your Gmail expertise

- Cloudfresh as a Partner
A suite of Google Workspace solutions, where collaboration and productivity meet seamlessly offers various services from Meet to Drive. In this comprehensive Gmail user guide, we will dive deep into one of Google’s most powerful and well-known tools: Gmail.
Gmail isn’t just your average email platform; it’s a hub for efficient communication, robust integration, and intelligent features designed to elevate your work. Whether you’re looking to streamline your business communication, build trust with professional email addresses, or protect your inbox from threats, Gmail has you covered.
Let’s explore the many capabilities of Gmail, dive deeply into some Gmail hacks, and unlock its full potential for mastering your corporate mail management, along with discovering some lesser-known tips and tricks.
How to use Gmail?
Gmail Labels
Effective email and information retrieval relies heavily on well-structured categorization. Within your corporate mailing, Gmail labels assume the role of distinguishing factors among your emails. It’s a special tag which you can add to the email you send or receive.
Unlike folders, emails can be assigned multiple labels, allowing for a more versatile organization approach. Let’s then see how to use labels in Gmail more precisely.
Firstly, you should go to your Gmail, scroll down to the left and click a Plus (+) sign in Labels. Name a new label and click on the create button.
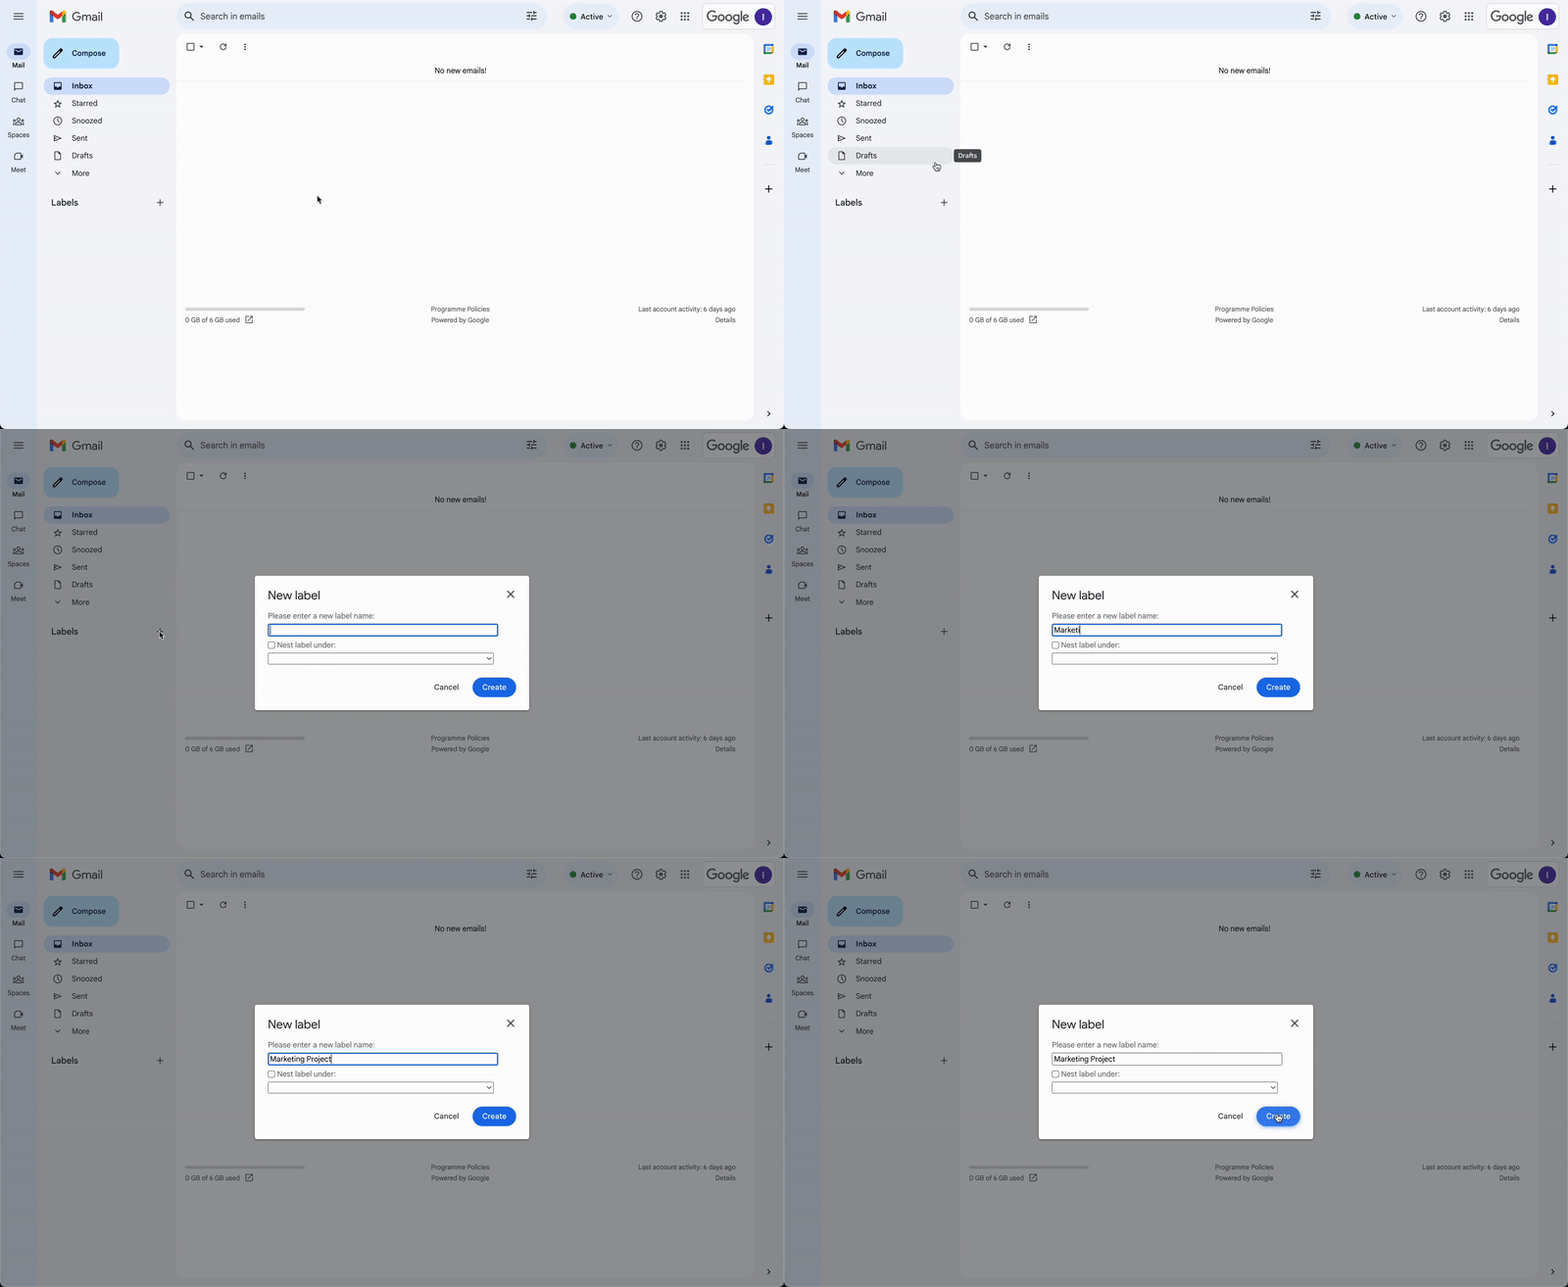
If you ever wondered how to delete labels in Gmail, that’s possible in a few clicks in the “Label” tab where you can easily make any changes to your labels.
Once you’ve created a label, you may need to add it to your messages, inbox, or simply move the message to another label.
- To put a label to your inbox: go to Gmail, select the messages you want to put the label on, click on Labels, and select or create the label you want to apply.
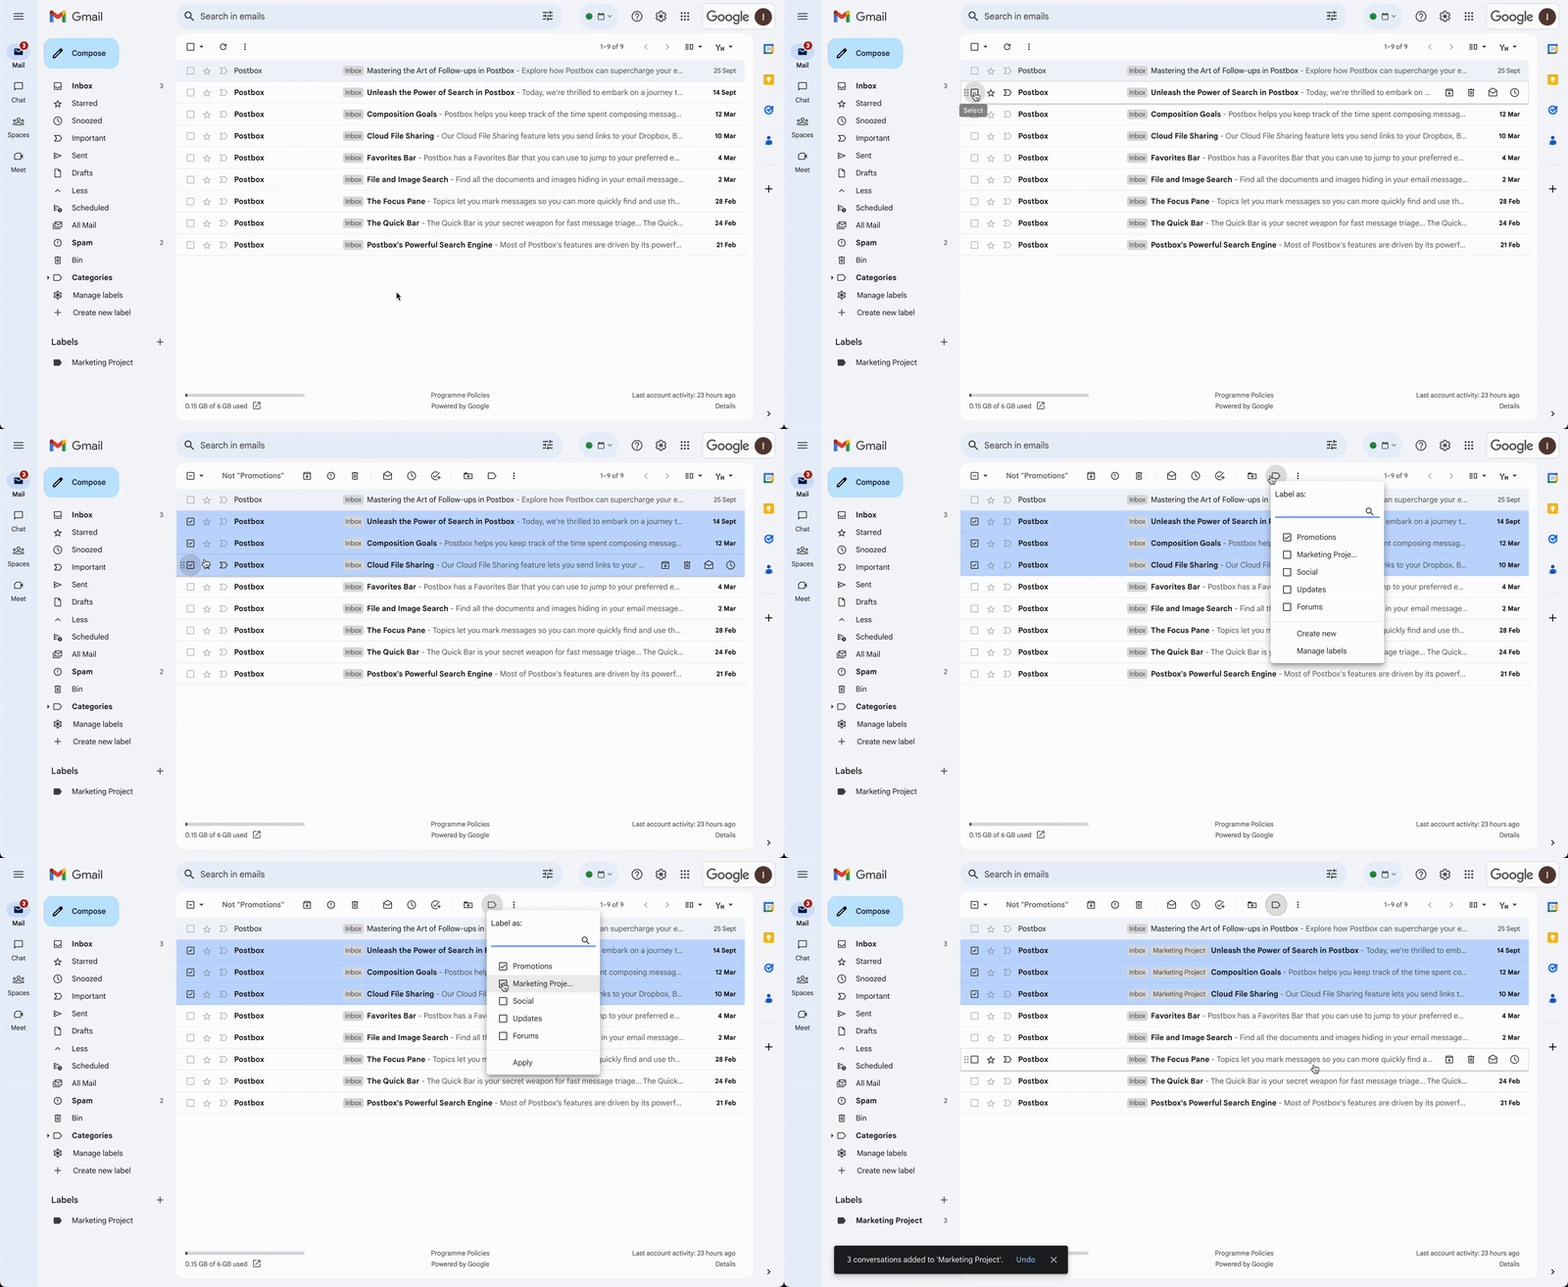
Access the complete edition of our guide to uncover additional insights about how to add labels in Gmail on the message you are writing, and put another label instead of the current one.
Inbox categories & tabs
Gmail provides the option to divide your Inbox into distinct tabs, or categories, such as Primary, Social, Updates, Forums, and Promotions. This categorization helps Gmail sort various emails into their respective tabs, enabling you to concentrate on each tab’s content as required. Let’s then explore more about how to create tabs in Gmail.
Let’s see how to add categories in Gmail:
- Open Gmail.
- Click on Settings (gear icon) at the top right, then choose “See all settings.”
- Navigate to the Inbox tab.
- Under the “Categories” section, mark the checkboxes for the tabs you wish to display. Note: You can’t create new tabs; you can only control the display of existing ones.
- Scroll down and click on Save Changes.
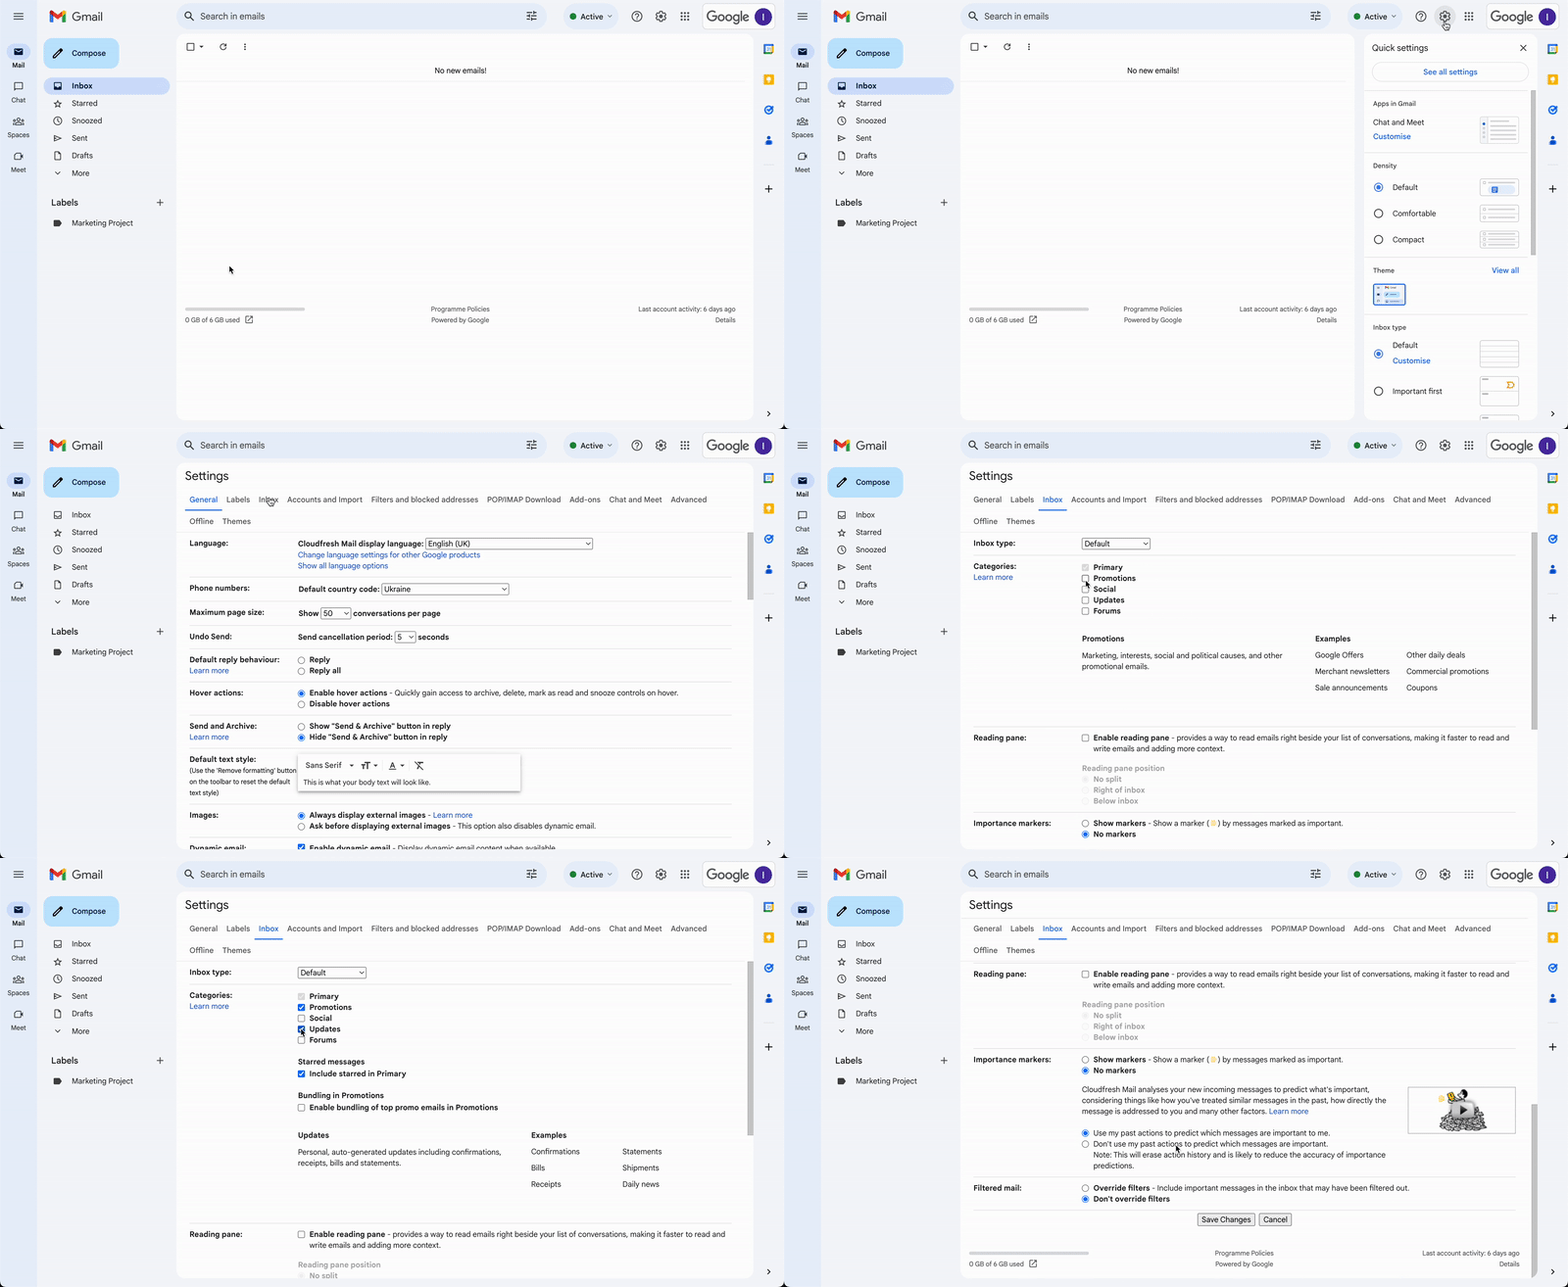
Wondering how to remove categories in Gmail, the process is pretty the same, so with the same algorithm you can simply delete your tabs.
Now that you know how to create and use Gmail categories, you can verify on your own experience on which level it would help you to run your messages and manage your mails smoothly and more effectively.
Tip : If you've activated notifications, they'll be limited to emails within your Primary category.
Gmail Filters
For the most proficient organization for your incoming emails, you can use Gmail filters to create rules to clarify your emails. This allows you to direct emails to specific labels, or perform actions such as archiving, deleting, starring, or setting up automatic forwarding for your messages.
If you’re ever curious about how to create filters in Gmail, here’s a step-by-step guide on how to accomplish it:
- Access Gmail.
- Click on the search box at the top to reveal search options.
- Input your search parameters. To verify the accuracy of your search, review the displayed emails by clicking on the Search button.
- At the bottom of the search pane, select Create filter.
- Determine the action for your filter
- Finalize the process by clicking on Create filter
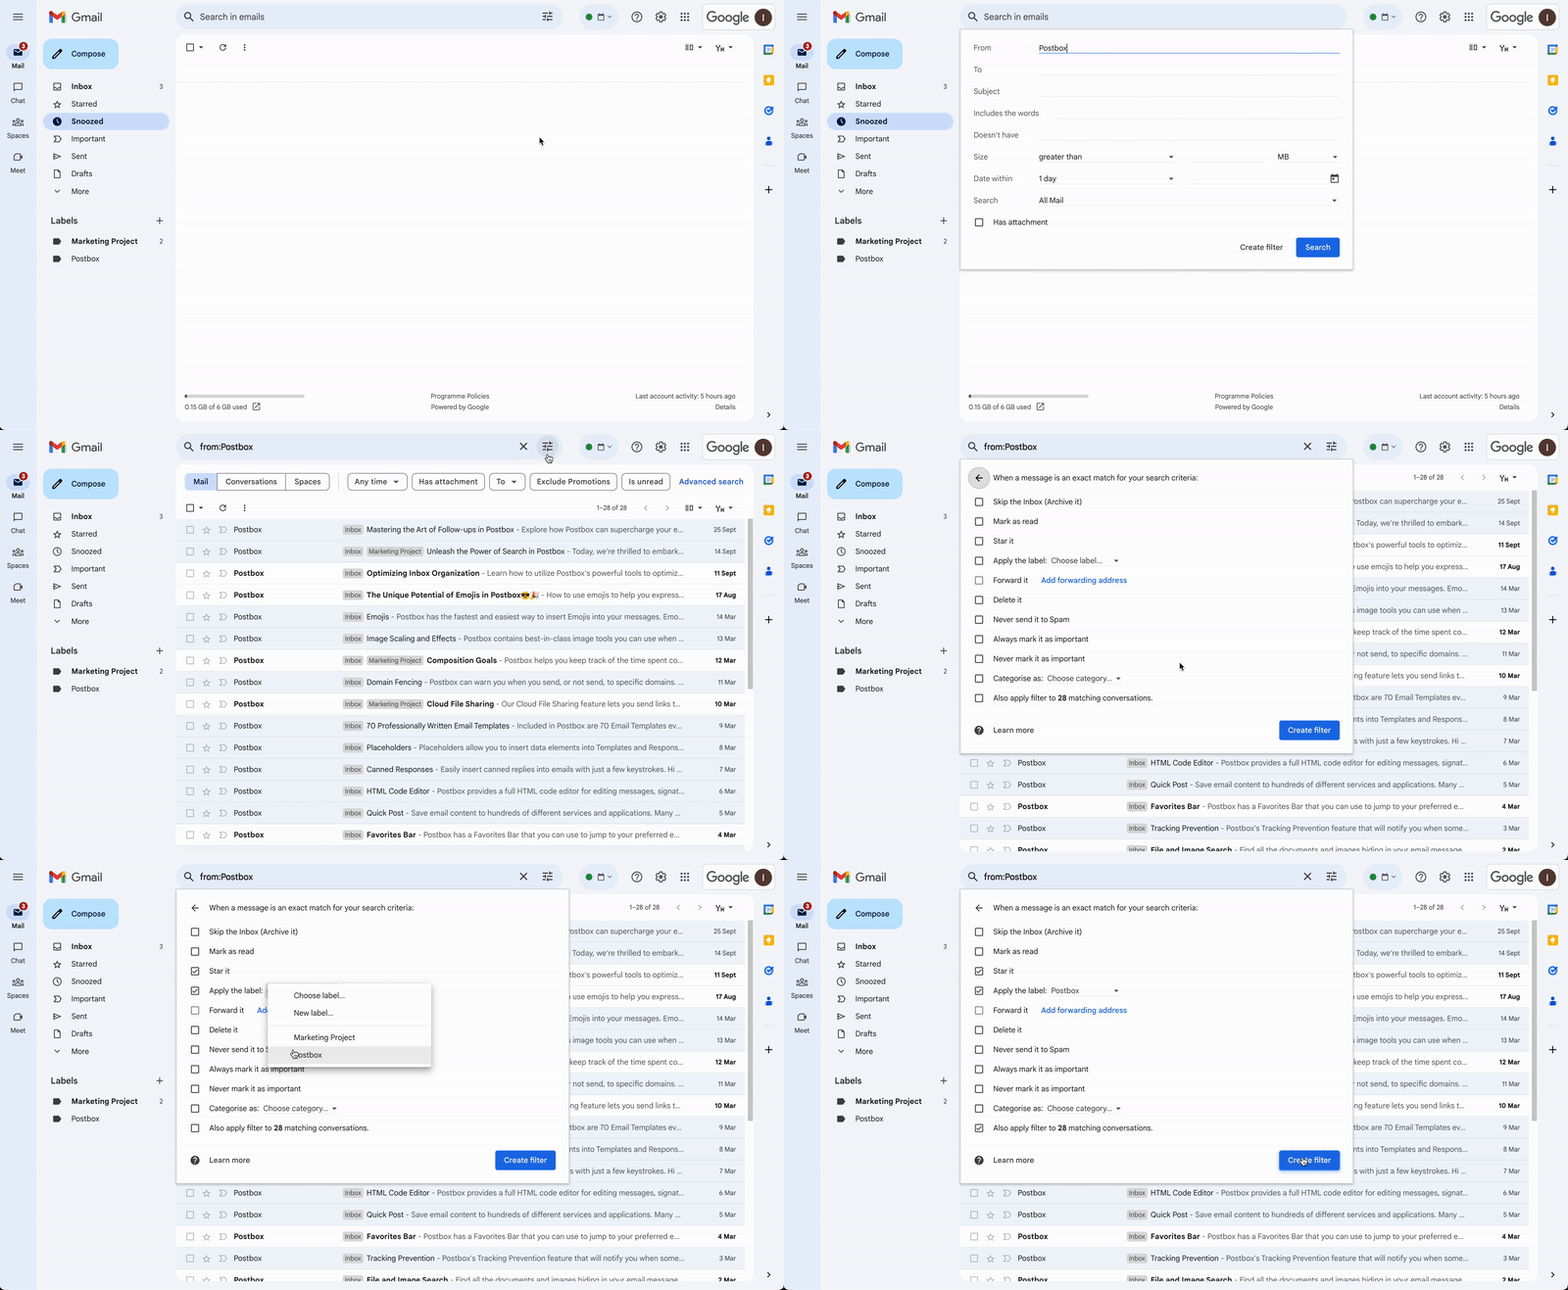
Also, if someone replies to a filtered message, their reply is filtered too, but only if it matches the same criteria. If you want to find out how to edit filters in Gmail or delete them, simply click the button below to instantly access the comprehensive step-by-step guide.
Tip Remember, if you set up a filter to forward messages, it only affects new ones.
Multiple inboxes in Gmail
Individuals with a Gmail account can incorporate mini inboxes, known as “multiple inboxes,” into their primary inbox. This feature allows you to categorize your inbox into distinct sections based on email type, project associations, or senders.
Handling Gmail multiple inboxes does not differ a lot from managing one Gmail inbox. You have the flexibility to determine how to arrange, prioritize, and address incoming emails. The primary distinction is that you’ll need to monitor all your inboxes, not just your primary one.
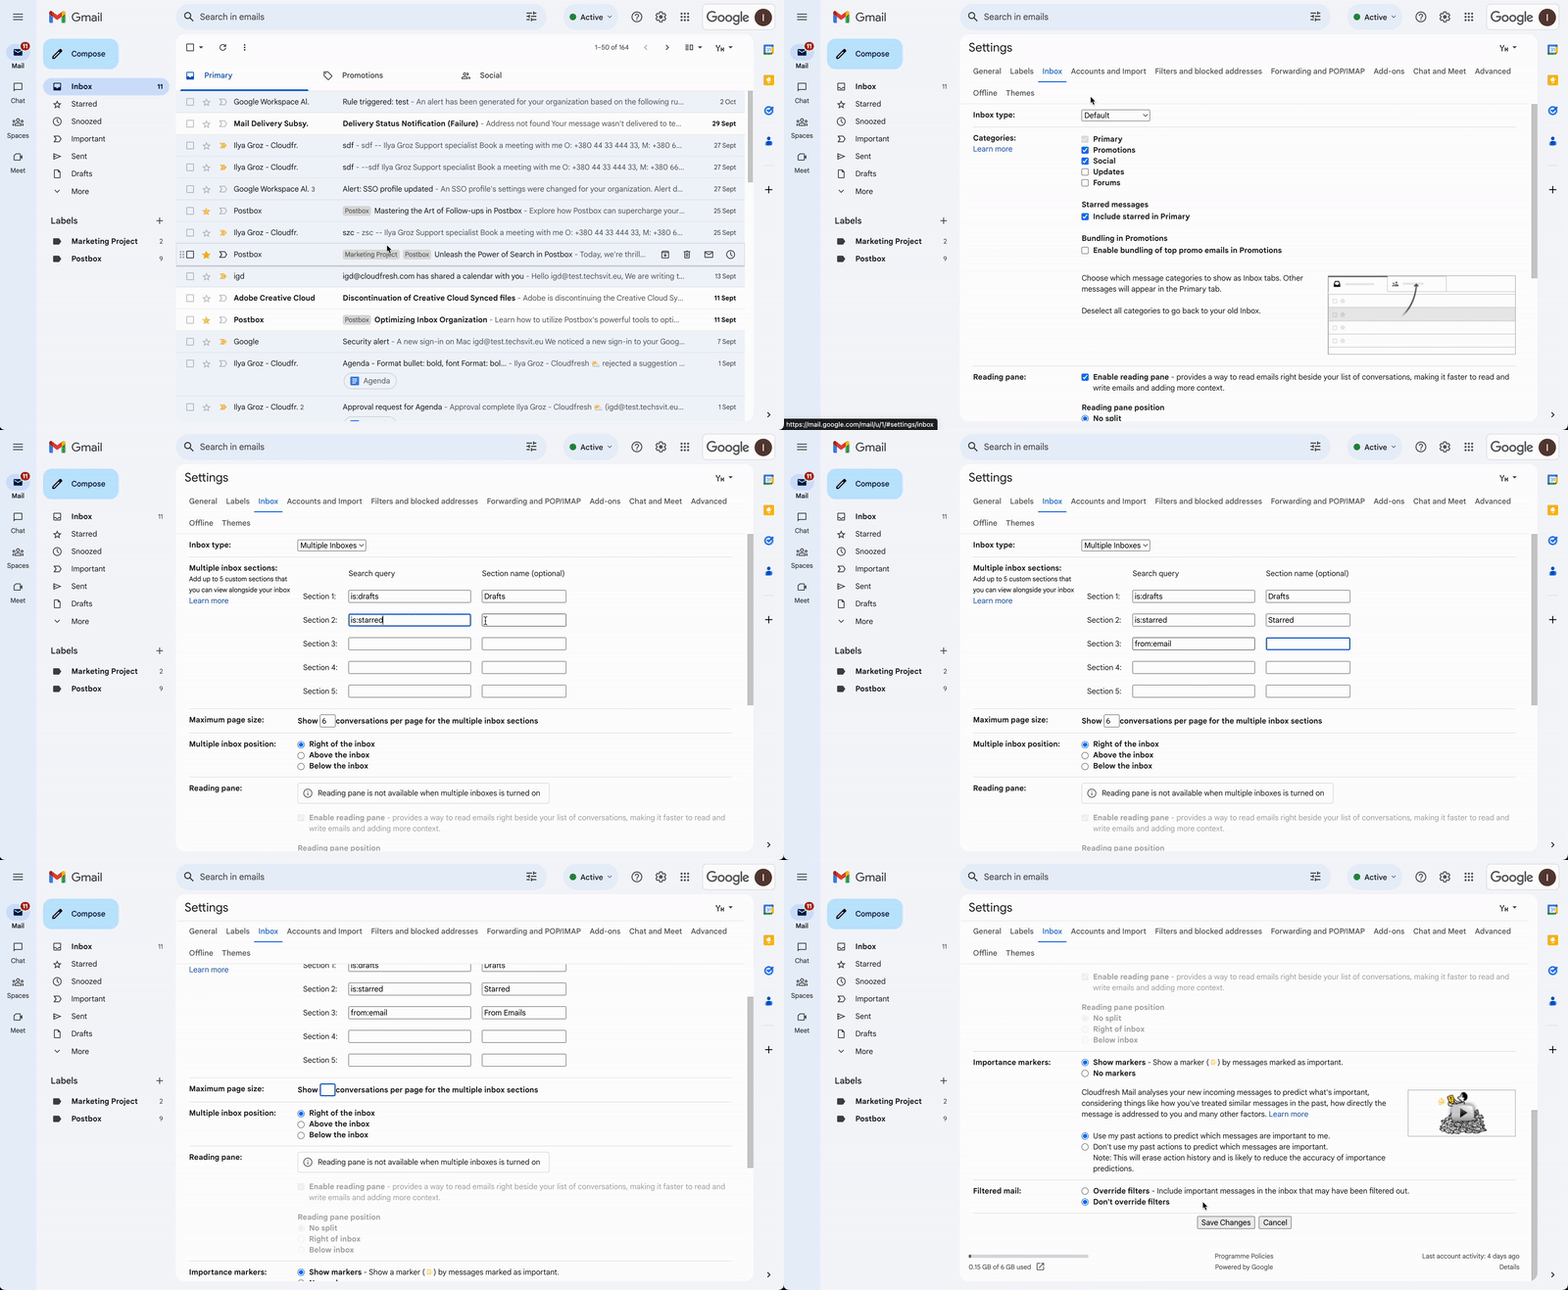
Here are the steps of how to set up multiple inboxes in Gmail:
- Open Gmail on your computer.
- Click on “Settings” at the top right corner.
- Next to “Inbox type,” choose “Multiple inboxes.”
- Enter the specific search criteria for each section.
- For starred emails, use: is:starred
- Enter a name for each section under “Section name.”
- Specify the number of emails you want to view in each section next to “Maximum page size.”
- Choose the placement of the multiple inboxes sections under “Multiple Inbox position.”
- Finally, click “Save Changes” at the bottom to save your settings.
To search for emails from a person’s email address, make sure to enclose it in double quotes for precise results. Example: “from:[email protected]”
Note that searching “from:email” will also include Drive sharing notification emails from that person.
Smart Compose
With the aid of machine learning, the Smart Compose feature offers suggestions as you type, enabling Gmail to assist you in composing emails more swiftly. Gmail provides automatic suggestions by default, and not only within Gmail, but also in Chat.
Let’s explore how to enable or turn off Smart Compose in Gmail:
To manage this setting on your computer:
- Open Gmail.
- Click on Settings (gear icon) at the top right, then select “See all settings.”
- Scroll down to “Smart Compose” under the “General” section.
- Choose between “Writing suggestions on” or “Writing suggestions off.”
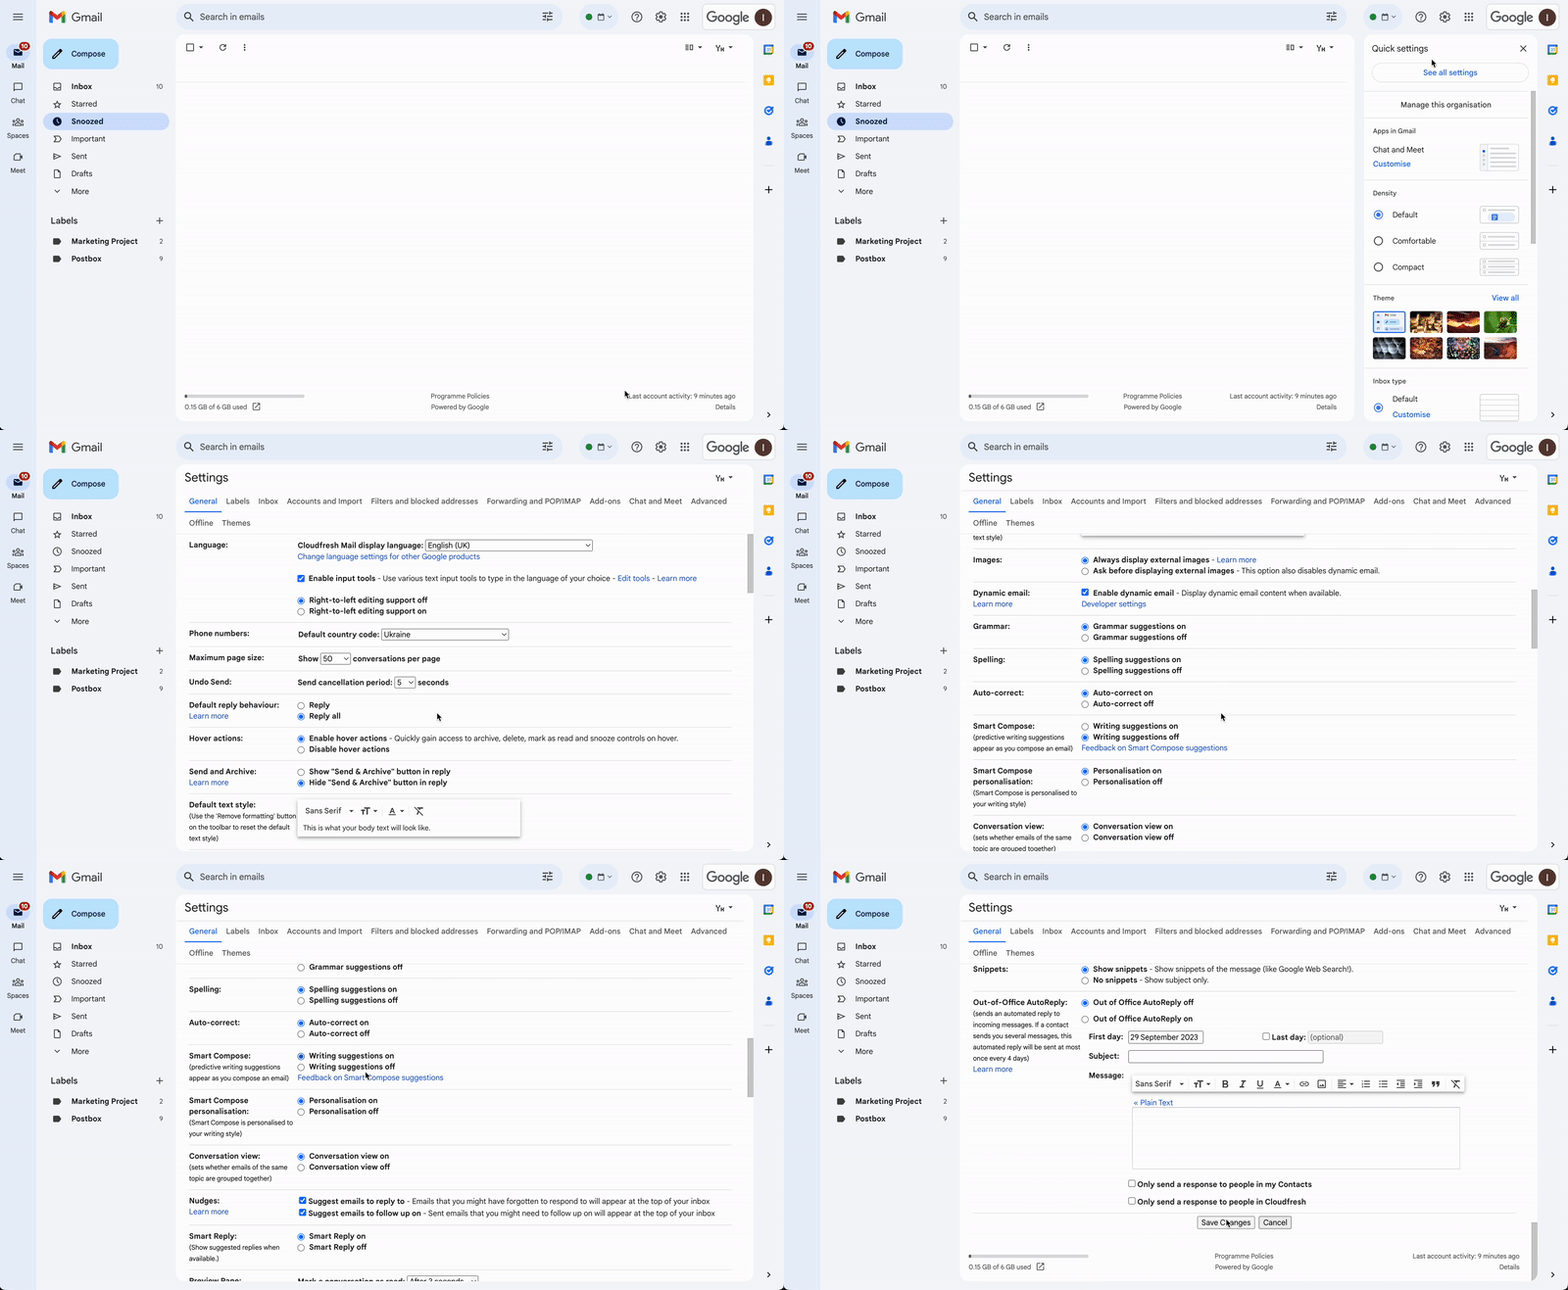
For a deeper exploration of custom suggestions in Gmail which are the suggestions tailored to the way you normally write, go to the complete version of our step-by-step guide.
Please keep in mind: Gmail Smart Compose is supported in English, Spanish, French, Italian, and Portuguese.
Distribution Lists
Imagine needing to send a work email to either the Sales team or the top management. If you have to manually select each name, it can be time-consuming and prone to overlooking some members. To address these challenges, the Google Workspace team has introduced a valuable feature: Gmail distribution list.
With this functionality, you can compile a list of individuals you want to communicate with collectively, simplifying the process of selecting recipients when sending a message. It’s a straightforward solution to streamline your communications and save your valuable time.
How to create a distribution list in Gmail?
- Log in to your Gmail account.
- Open the app menu and choose “Contacts.”
- Choose the contacts you wish to include.
- Click on “Create label.”
- Give the new label a name.
- Finally, click “Save.”
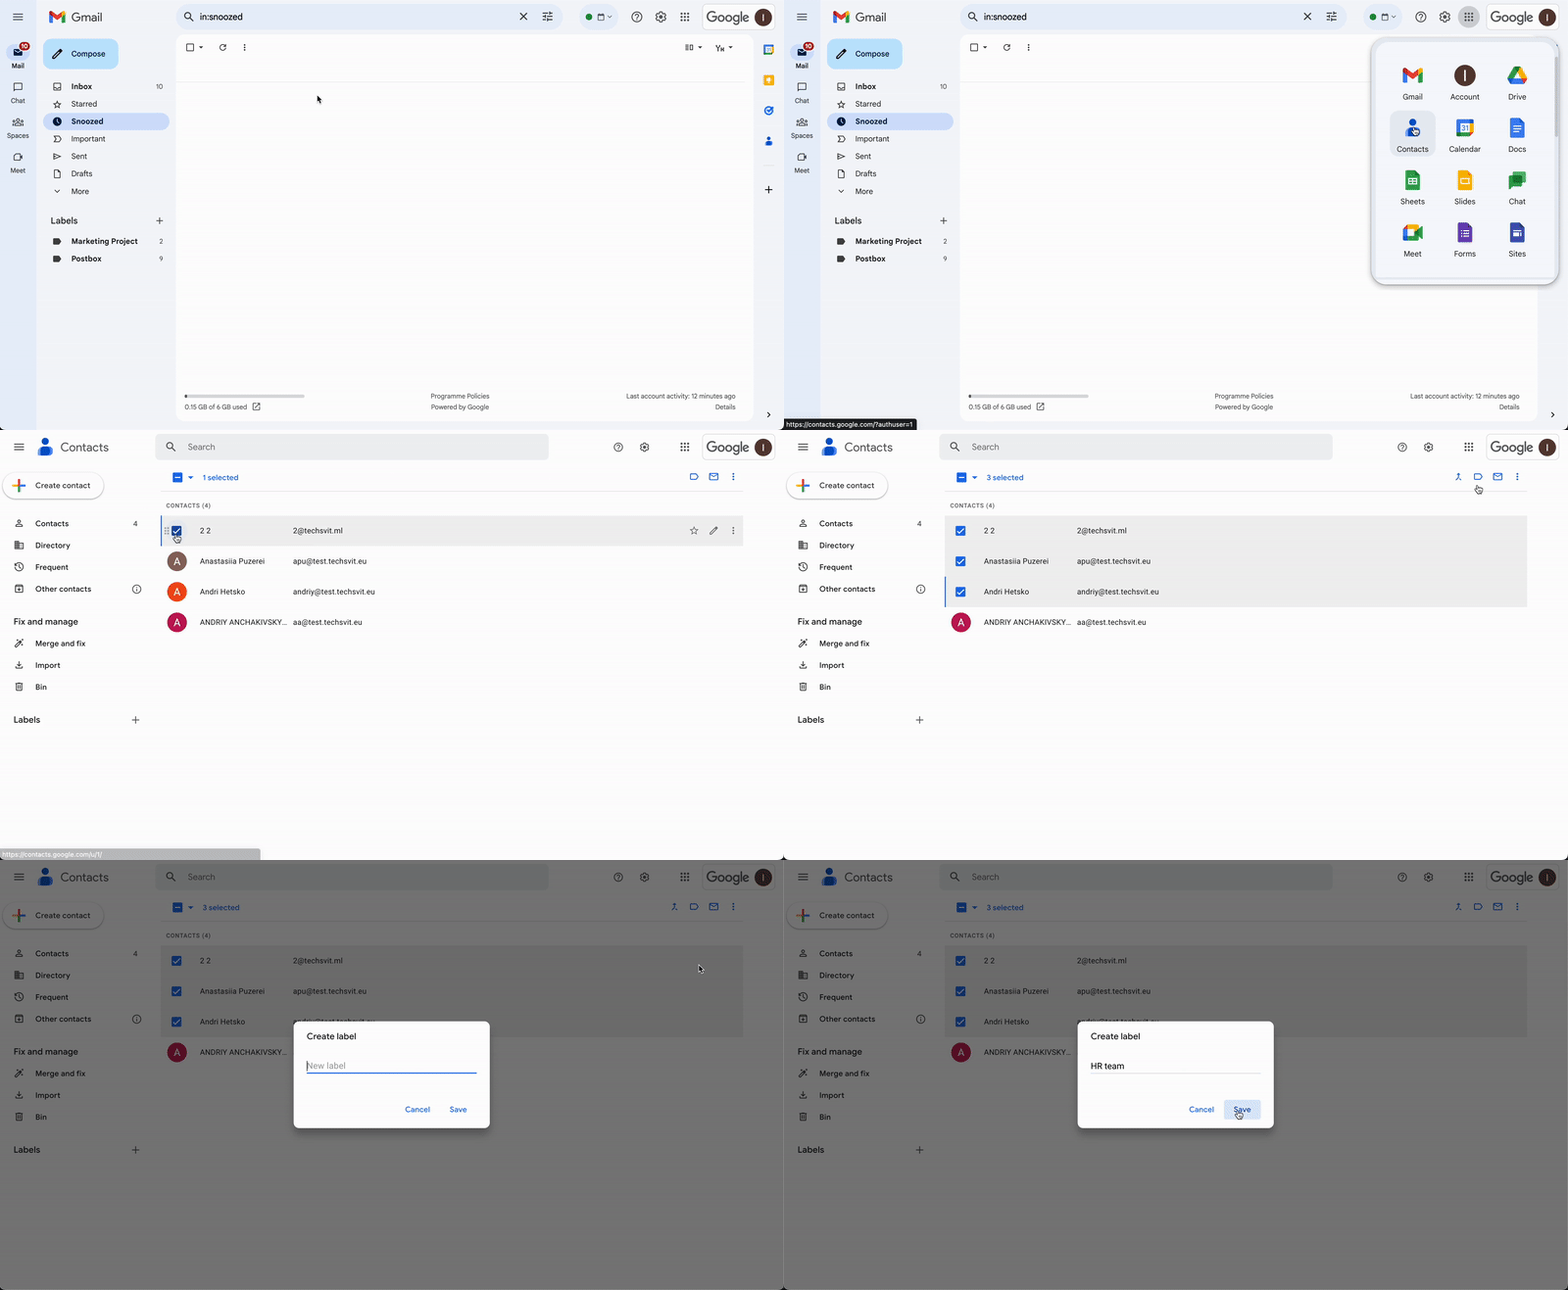
Now you can definitely master the creation of your initial Gmail contact group with the help of distribution lists in Gmail and to send a single message to multiple recipients.
Tip: Please note that when sending a message to the contact group, all recipients will receive it, but they won't be able to see who else has received the message.
Vacation Responder
While starting your vacation, or having a weak network, you can set up the Gmail vacation responder to prevent people who write to you that your response can be slow during a particular amount of time. To enable users to do so, Gmail has a vacation responder functionality which is easy to set up.
Let’s see how to set out-of-office in Gmail. Just follow these steps:
- Open Gmail.
- Click on “Settings” located in the top right corner, then select “See all settings.”
- Scroll down to the “Vacation responder” section.
- Toggle “Vacation responder” to the “on” position.
- Specify the date range, subject, and message for your vacation response.
- Below your message, tick the box if you want only your contacts to view your vacation reply.
- Finally, at the bottom of the page, click “Save Changes.”
You can take a deep dive on Google Calendar vacation settings in our latest blog.
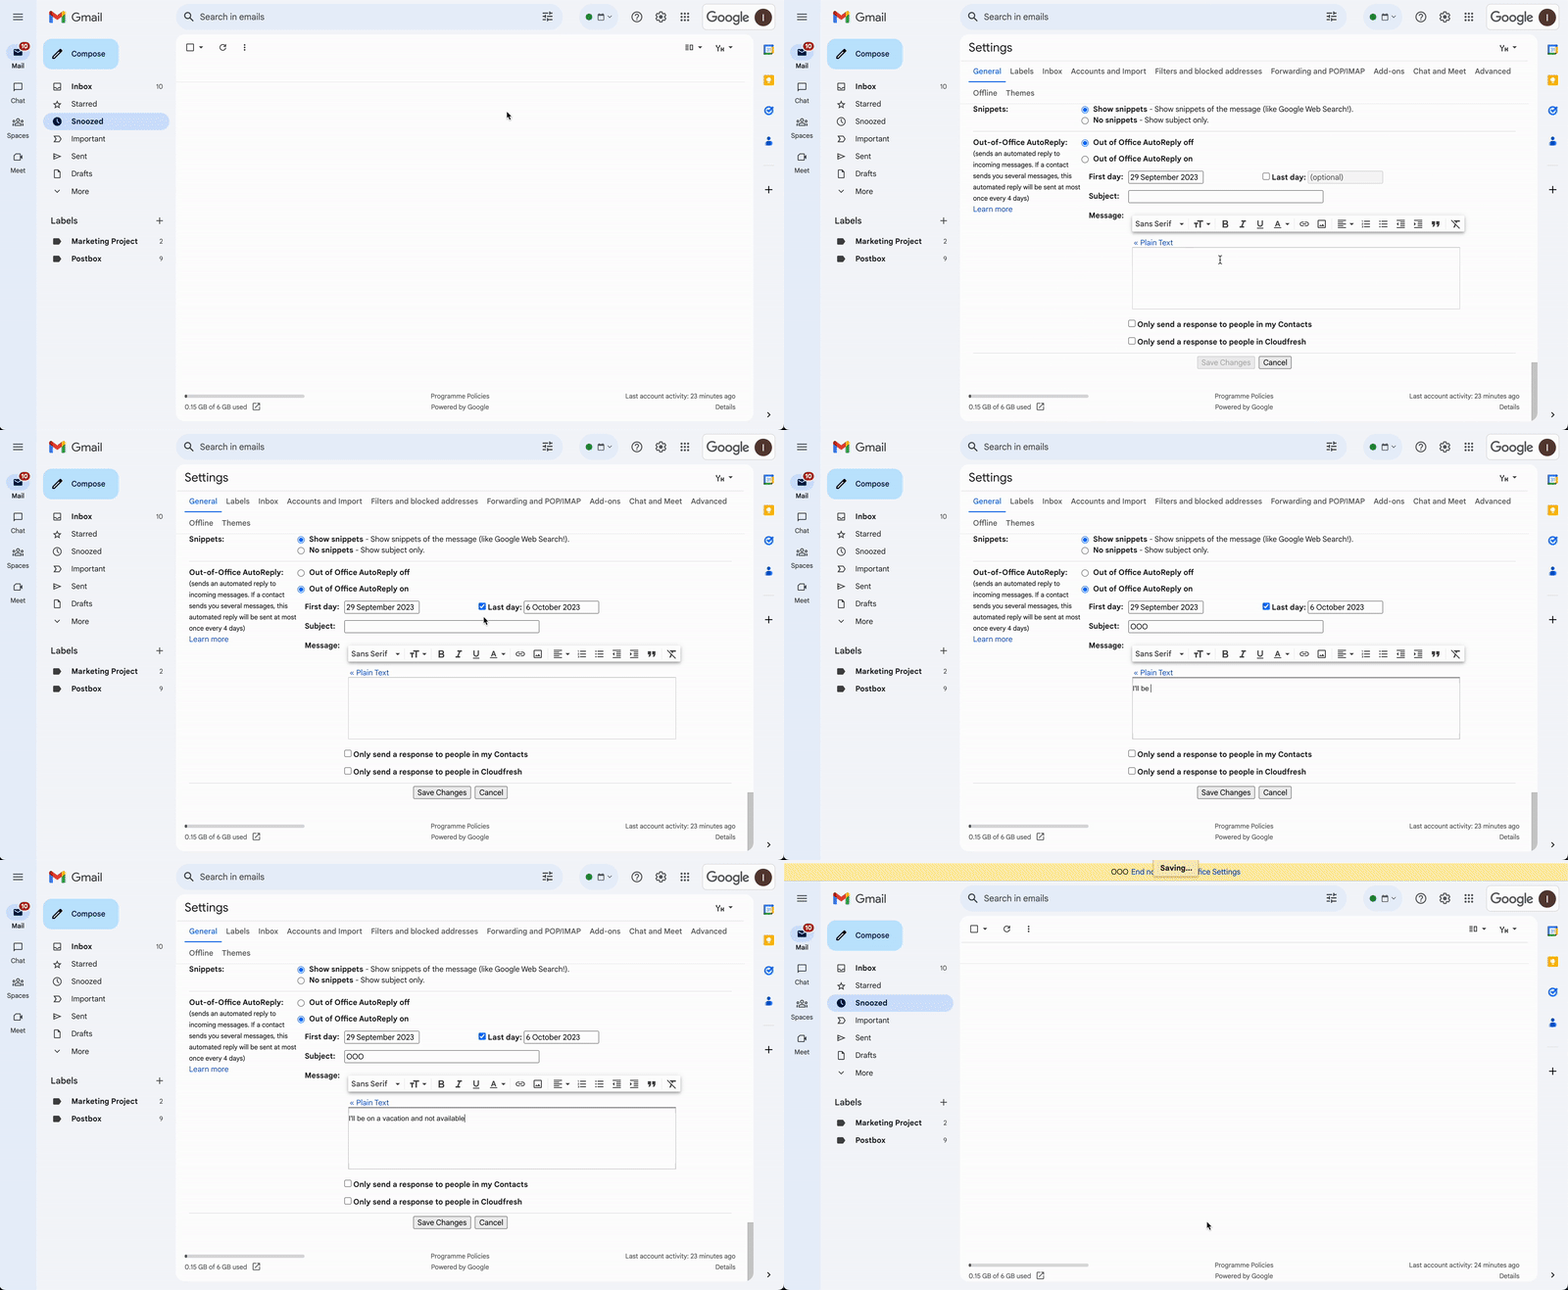
When your vacation response is active, a banner displaying the subject of your vacation reply will appear at the top of your inbox. To deactivate your vacation response, simply click on "End now." Learn more information about when your Gmail auto reply is sent, do the same people get your response again and what happens after the updates of your responses during your vacation in the full version of this guide.
Tip: You have the option to decide whether your response is sent to everyone, exclusively to your contacts, or to individuals within your organization with the same domain name. Your vacation response won't be sent to messages that end up in your spam folder or addressed to a mailing list you are subscribed to.


