Assignments That Look Out for You: Asana Outlook Calendar Integration
Making Meetings Easy with Outlook Scheduling Assistant
- How to Use Scheduling Assistant in Outlook

- More Things to Pay Attention To

If you’ve ever tried setting up a meeting where everyone’s schedules align, you know it can feel like a balancing act. That’s where Scheduling Assistant by Outlook comes in—allowing you to do just that with a lot less back-and-forth. Not only can it help you find the perfect time, but it also lets you book meeting rooms and manage different time zones with little to no effort. Here’s a breakdown of how you can start using it to make scheduling as smooth as possible.
What is the Scheduling Assistant Outlook?
Scheduling Assistant in Outlook is a built-in feature designed to simplify meeting planning. Instead of guessing who might be free or trying to get everyone to respond to yet another email, you can see each person’s availability in a clear timeline format. Outlook even suggests meeting times and integrates with Room Finder if you’re booking a space. It’s a time saver and a great way to keep things organized, especially when everyone has packed calendars.
How to add the Scheduling Assistant in Outlook?
Before configuring a new event, check if the Scheduling Assistant add-in is active on your Outlook account and appears on your ribbon.
How to Use Scheduling Assistant in Outlook
To start using the Scheduling Assistant:
- Create a New Meeting: Open Outlook, go to your calendar, and select “New Event.”
- Populate the “People” field: Specify the co-workers you want to participate in the discussion.
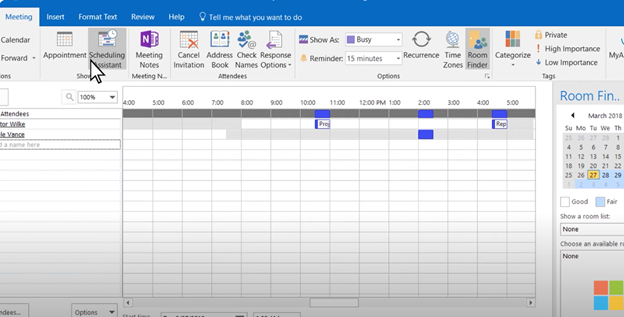
- Access the Scheduling Assistant: In the meeting window, click on the “Scheduling Assistant” tab. This opens up a handy timeline where you can see each attendee’s availability.
In this view, you’ll get an easy-to-read schedule for everyone, showing who’s free, who’s busy, and when everyone’s open at the same time.

Adding Attendees
Adding people to your meeting is simple, and Outlook helps you manage who’s essential and who’s optional:
- Type in Names or Emails: Just type the names or email addresses of the people you’re inviting. Outlook will pull suggestions from your contacts, so adding your usual team members is quick.
- Mark Required vs. Optional: If some people are “must-haves” for the meeting, mark them as “Required.” Others can be marked “Optional,” which is helpful if some attendees don’t need to be there every time.
Once you’ve added everyone, you’ll see their schedules automatically appear. Color-coded blocks show who’s available (green) and who’s busy (red). This gives you a visual overview of everyone’s availability.
Finding the Best Time to Meet
Scheduling gets even easier when you use the Assistant’s features to pick the best time.
- Check AutoPick: Outlook suggests ideal time based on pre-determined criteria, which can save you a lot of time scrolling through everyone’s schedules.
- Resolve Conflicts Quickly: If anyone’s schedule conflicts with the selected time, you’ll notice it right away. Just move the meeting slot around in the timeline until everyone’s free.
- Drag to Adjust Time: If the time isn’t quite right, you can adjust it directly in the timeline view by dragging and dropping. It’s an easy way to fine-tune the schedule without having to go back and forth.
Suggested times and visual markers make finding a convenient time fast and straightforward, even for larger groups.
Booking a Room with Room Finder
If you’re scheduling an in-person meeting, Outlook’s Room Finder can help you locate an available space in your building.
- Open Room Finder: In the Scheduling Assistant Outlook view, you’ll see a “Room Finder” control button on the ribbon.
- Use Filters for Specific Needs: You can filter rooms by location, size, or even specific equipment, such as screens or conferencing tools.
- Choose Your Room: Once you find an available room, just click it to add it to your invite. The room will then show up as the meeting’s location.
Room Finder is particularly useful in big offices where finding an available room might otherwise be tricky. This way, you don’t have to worry about double-booking or missing out on a suitable space.
More Things to Pay Attention To
Setting up Recurring Meetings
For recurring meetings, such as regular team sync or monthly review sessions, Outlook lets you set up a repeating schedule with just a few clicks:
- Enable a Recurrence Pattern: Select “Make recurring” from the drop-down menu next to the end time.
- Specify End Date: You can either set a specific final date or choose to have the meeting repeat indefinitely.
- Review Recurrences: Once you’ve scheduled a recurring meeting, double-check the timeline to make sure there aren’t any conflicts in the series. Save changes.
Setting up recurring meetings this way is an easy way to keep a standing appointment without having to recreate it each time. It’s efficient and helps everyone plan around regular meetings.
Adding Important Meeting Details
Outlook’s Scheduling Assistant isn’t just about timing; you can also add important meeting details to keep everyone prepared.
- Include an Agenda: Add a brief agenda to the body of your invite, giving attendees a heads-up on what will be discussed. It’s a small step that makes a big difference in helping everyone come prepared.
- Attach Files or Documents: Use the “Insert” option in Outlook to attach any files attendees might need, like reports, slide decks, or documents. Having these available in advance is a great way to set everyone up for a productive meeting.
- Add a Video Link: If the meeting is virtual, include a link to your video conferencing platform. Outlook makes it easy to add Microsoft Teams links, and having it embedded in the invite saves time.
Adding these details means everyone has the materials they need and knows what to expect, making the meeting smoother and more efficient.
Tracking RSVPs and Attendance
Once you send out the invite, the Outlook makes it easy to keep track of responses (you can find the corresponding button next to the Scheduling Assistant at the top of Outlook):
- Monitor RSVPs: People can respond with “Accept,” “Tentative,” or “Decline,” and you can see these responses within the meeting invite. It’s a quick way to see who’s attending.
- Reschedule if Needed: If someone essential can’t make it, you can go back into the Scheduling Assistant to pick a new time that works for everyone, then resend the invite.
- Send Reminders if Necessary: If anyone hasn’t responded and you need them to attend, a quick reminder message can prompt them to reply.
Tracking RSVPs helps you confirm attendance and, if necessary, make adjustments in advance to ensure the proper people are there.
Managing Time Zones for Remote Teams
If you’re coordinating across time zones, Outlook makes it simple to keep everyone on the same page:
- Add Time Zones: When creating the meeting, you can adjust the time zone to show each participant’s local time. This ensures everyone has the correct information.
- Automatic Adjustments: Outlook will display the meeting time in each person’s local time zone, reducing confusion and ensuring everyone joins on time.
As Outlook handles time zone conversions automatically, global teams can meet without any hiccups associated with having to figure out different time zones in a manual manner.
To sum up, you can view Outlook’s Scheduling Assistant as a personal assistant for planning meetings. Once familiar with its features, you’ll be able to organize meetings in minutes and free up time to focus on its contents. It’s also worth noting that Outlook (and hence, the Scheduling Assistant) comes as part of a Microsoft 365 subscription, which you can purchase from Cloudfresh—an official Microsoft Partner. To order a Proof-of-Concept of the entire ecosystem or its particular components, please submit the short form below.


