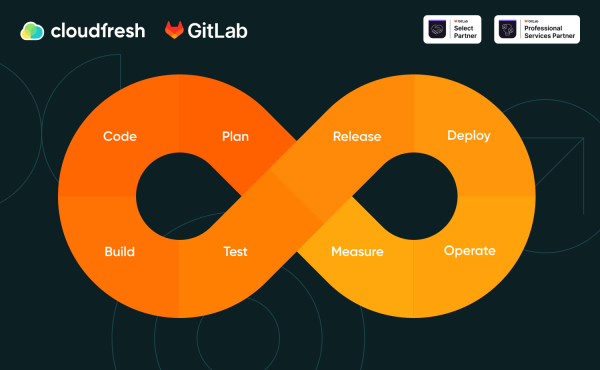


What is Gitlab?
GitLab 28.06.2023
How Do I Deploy Self-managed GitLab on Cloud Platforms?
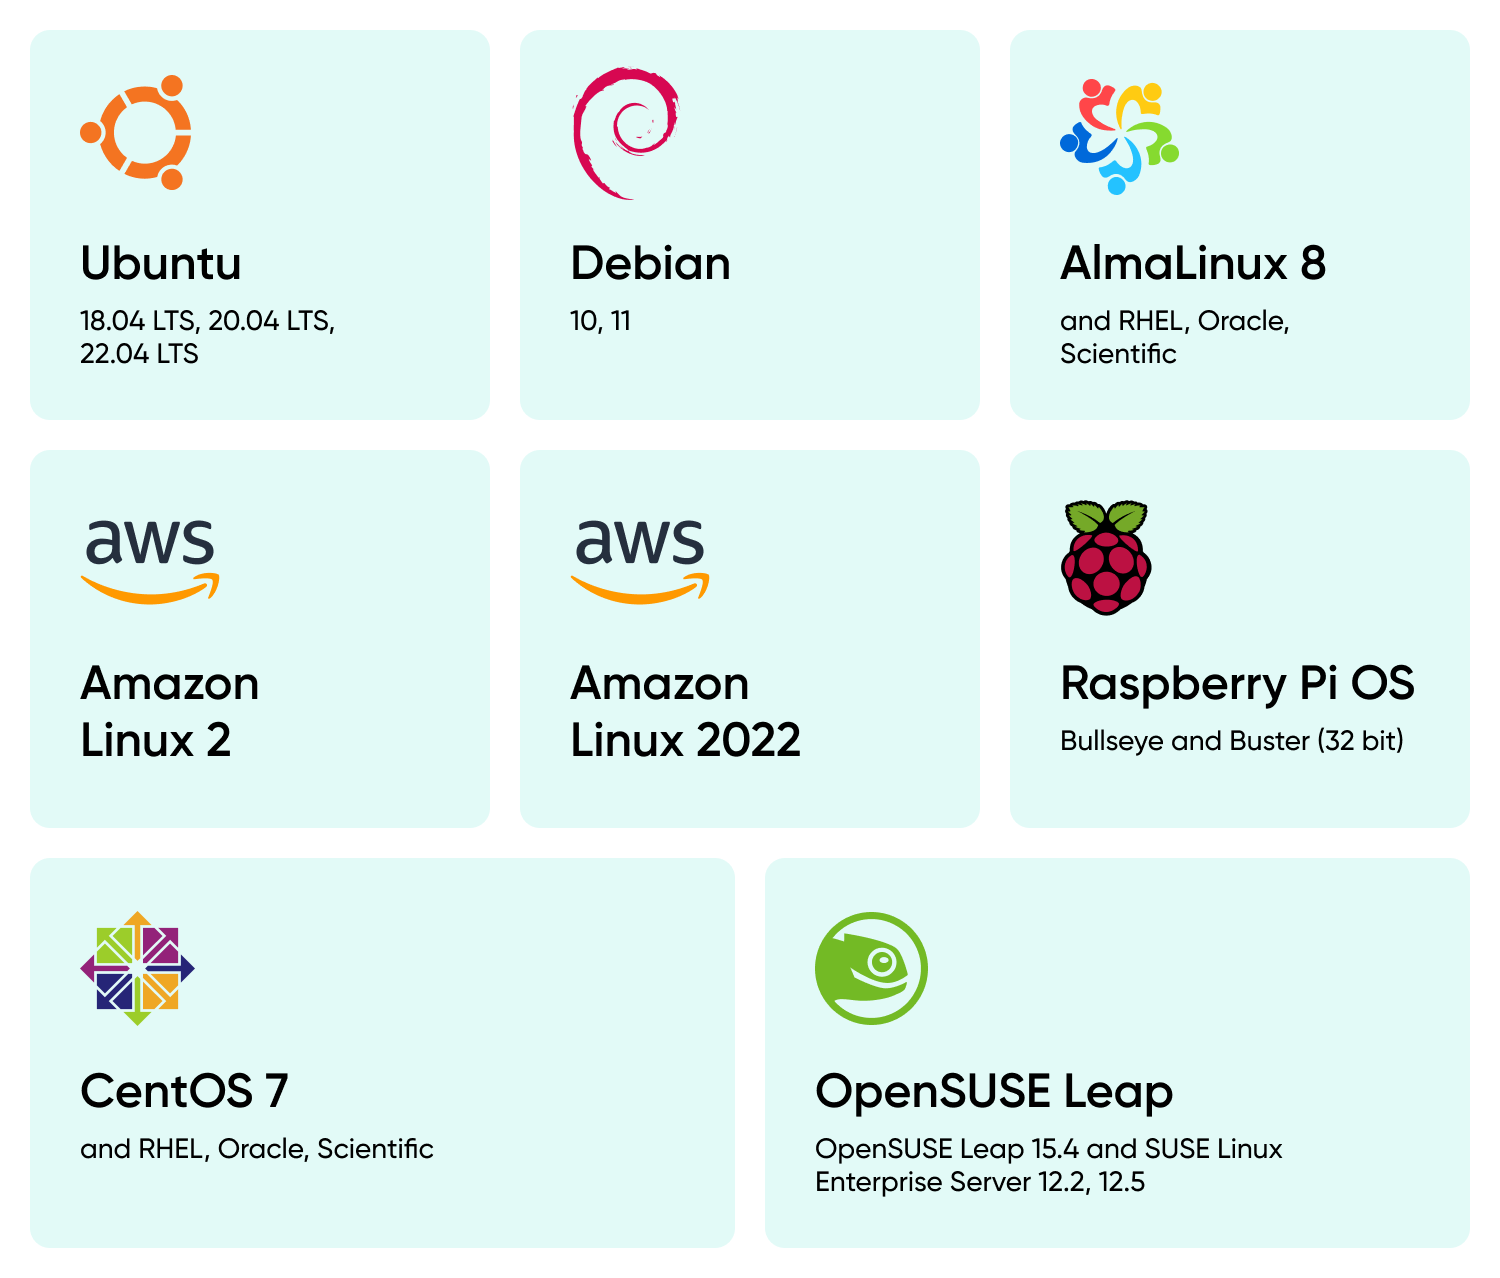
GitLab can be installed on Amazon Web Services, Google Cloud Platform, Microsoft Azure, and other systems supporting Linux.
This article will introduce different methods for installing GitLab on specific cloud platforms. In addition, we will provide instructions on how to easily install GitLab for companies with up to 500 users, taking into account their needs and requirements. To understand the basics of the platform before deployment, you can read our overview on what is GitLab.
Let’s start with what installation methods exist in general:
Official Linux package
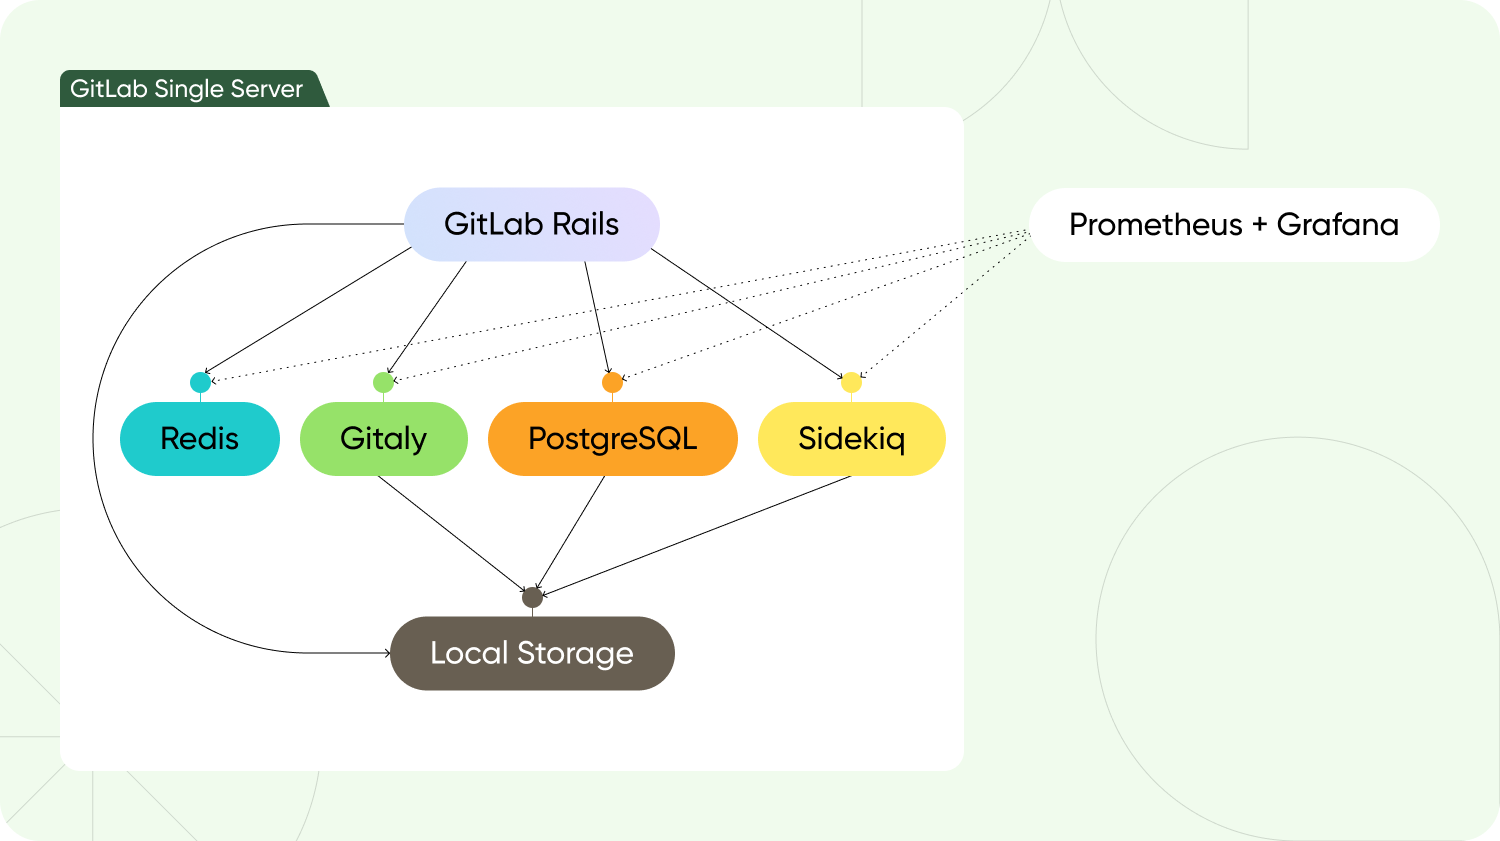
GitLab recommends using a Linux package called Omnibus to efficiently deploy a standalone version of GitLab on various cloud platforms such as GCP, AWS, Azure, and others. This method is suitable for up to 1000 users. This approach ensures fast and high-quality implementation of a full-fledged DevSecOps platform to improve best practices in the software development life cycle (SDLC). The Omnibus package includes all the necessary services and tools to ensure uninterrupted operation, easy administration, and, most importantly, constant updates.
Reference architectures
GitLab has developed and tested unique reference architectures that are optimized for recommended deployments at large scale. GitLab’s reference architecture packages can successfully work with many users – from 1,000 to 50,000. However, your needs are to create an environment for fewer users (up to 3,000). In that case, we recommend using an alternative method, as the reference architecture requires a high availability balance so that each component of the GitLab system can work effectively during failures using different mechanisms. Achieving this level is challenging; creating the necessary environment can be time-consuming and effort-intensive. For such complex setups, managing GitLab custom roles becomes a vital part of maintaining secure access control.
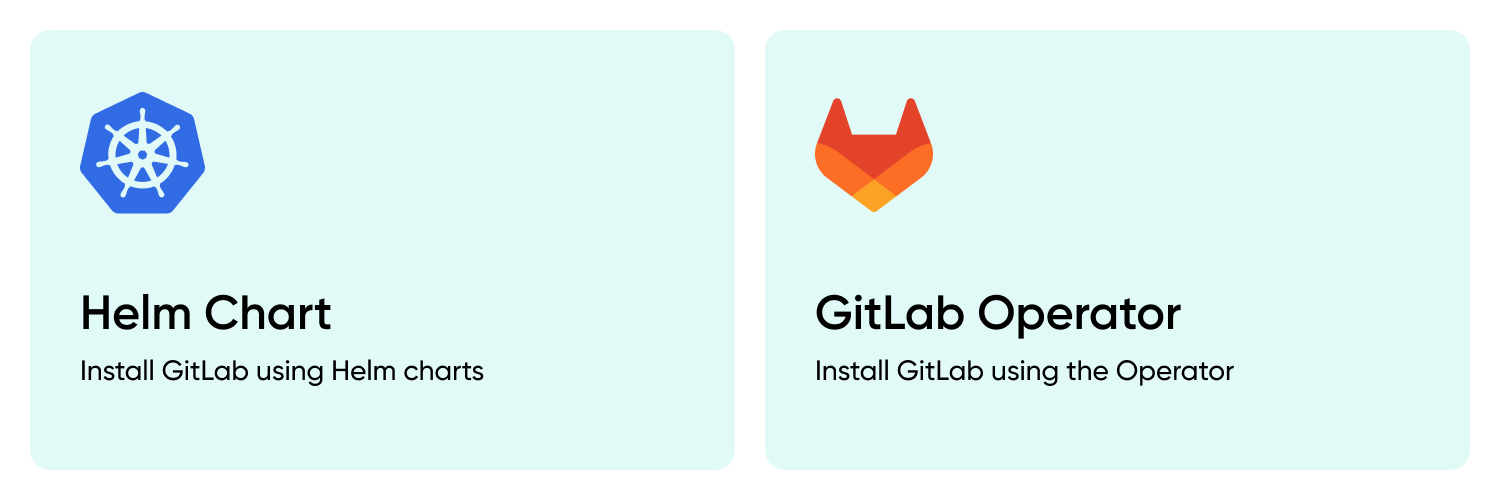
GitLab Helm chart (Kubernetes)
Helm Chart includes all the necessary components for a quick start and can scale to large deployments. If you are planning to install GitLab on the OpenShift platform, it is recommended to use GitLab Operator. In other scenarios, you must configure the security context restrictions yourself. However, GitLab does not recommend this approach for production environments, as it deploys all GitLab services within a cluster. Components such as PostgreSQL or Gitaly should run outside the cluster to ensure that GitLab works perfectly and reliably. This configuration ensures scalability and reliable service of workloads in the GitLab environment. If you use Kubernetes, GitLab recommends deploying a reference architecture for Kubernetes called Cloud Native Hybrid.
Cloud Native Hybrid
This approach uses a reference architecture with a significant difference: not all services are placed within the same cluster to ensure optimal performance of workflows. All data storage components must operate outside the cluster. GitLab is actively developing Infrastructure as a Code (IaC), which allows you to customize the combination of Helm Chart with additional cloud infrastructure such as Google Kubernetes Engine (GKE) or Amazon Elastic Kubernetes Service (EKS), providing scalability and flexibility of deployment.
How do I install GitLab and make the lowest settings to get it up and running?
We will focus on the easiest and most common method – the official package for Linux.
GitLab self-managed has two types:
- GitLab CE (Community Edition).
- GitLab EE (Enterprise Edition).
Both types have minor differences and are free until you purchase a license. However, the main difference is that GitLab CE is a free version that cannot be licensed. Therefore, if a company plans to use paid functionality, it is recommended to install GitLab EE immediately to avoid additional costs for future migration.
First, we must choose a web server on which our GitLab will be deployed. Here are GitLab’s recommendations for selecting a server on AWS, GCP, and Azure platforms:
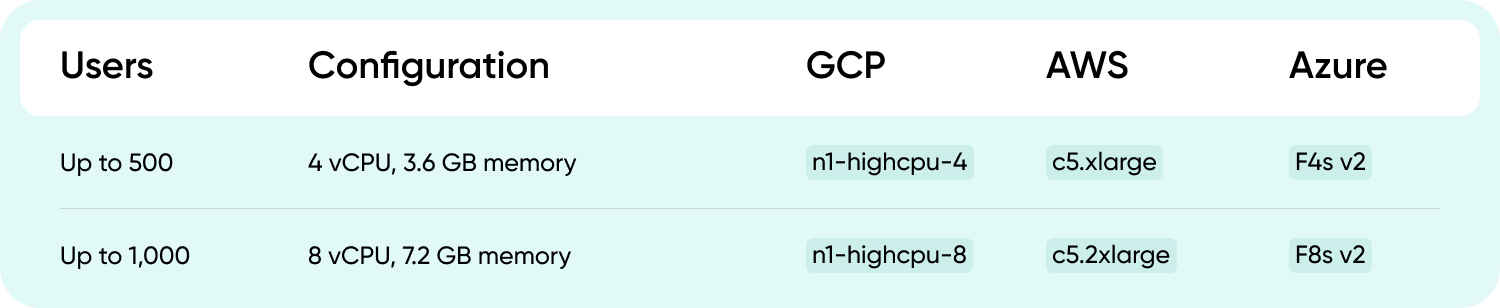
Considering GitLab’s recommended specifications for a working machine and their suggestion to add 2 GB of SWAP space, we suggest choosing a device with at least 8 GB of RAM and adding 4 GB of SWAP space to ensure smooth administration. During system setup and upgrades, there can be a significant load that can stop the process. The time spent on troubleshooting possible problems is worth the difference in the machine’s price. After creating the necessary machine with the chosen operating system, for example, Ubuntu 22.04, we start installing and configuring the required dependencies.
We start by installing and configuring the appropriate dependencies.
sudo apt-get update
sudo apt-get upgrade
sudo apt-get install -y curl openssh-server ca-certificates tzdata perl
According to GitLab’s recommendations, the next step is to install Postfix to send email notifications. However, if you want to use an alternative tool, you can skip this step and set up an external SMTP server after installing GitLab. You can find detailed instructions on configuring this option in the GitLab documentation.
sudo apt-get install -y postfix
After that, Postfix will open the configuration screen where we need to select the type of website:
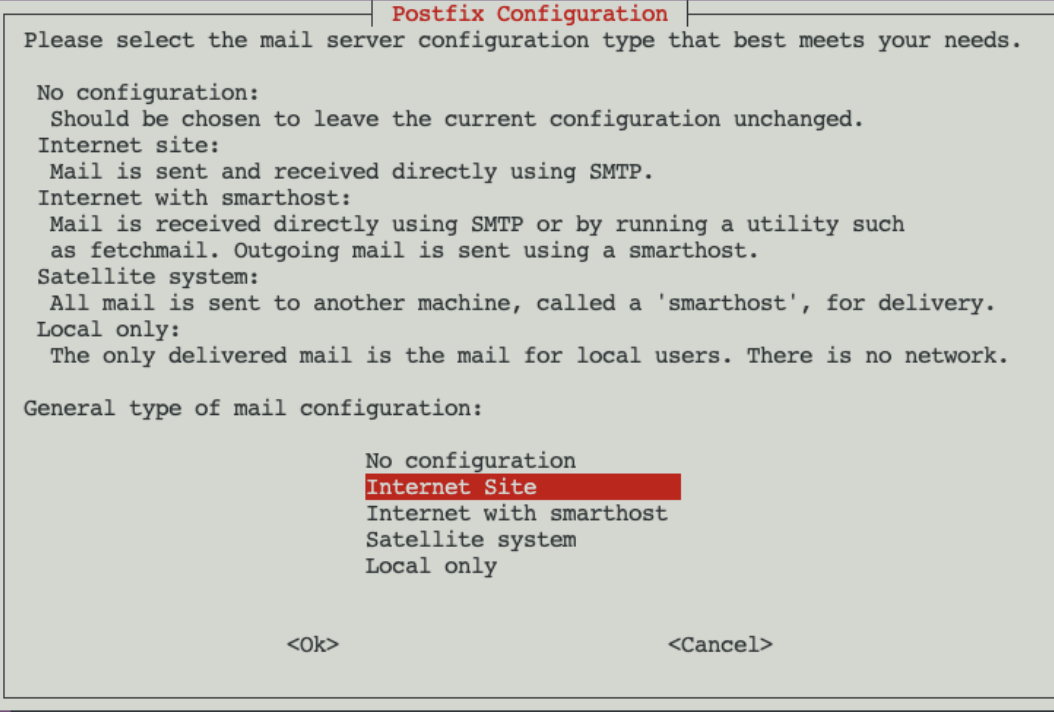
Next, we specify the domain of our GitLab <gitlab.example.com>:

For all other questions, click the “OK” button to accept all the default values.
Add and install the GitLab package repository.
curl https://packages.gitlab.com/install/repositories/gitlab/gitlab-ee/script.deb.sh | sudo bash
Next, install GitLab.
sudo apt-get install gitlab-ee
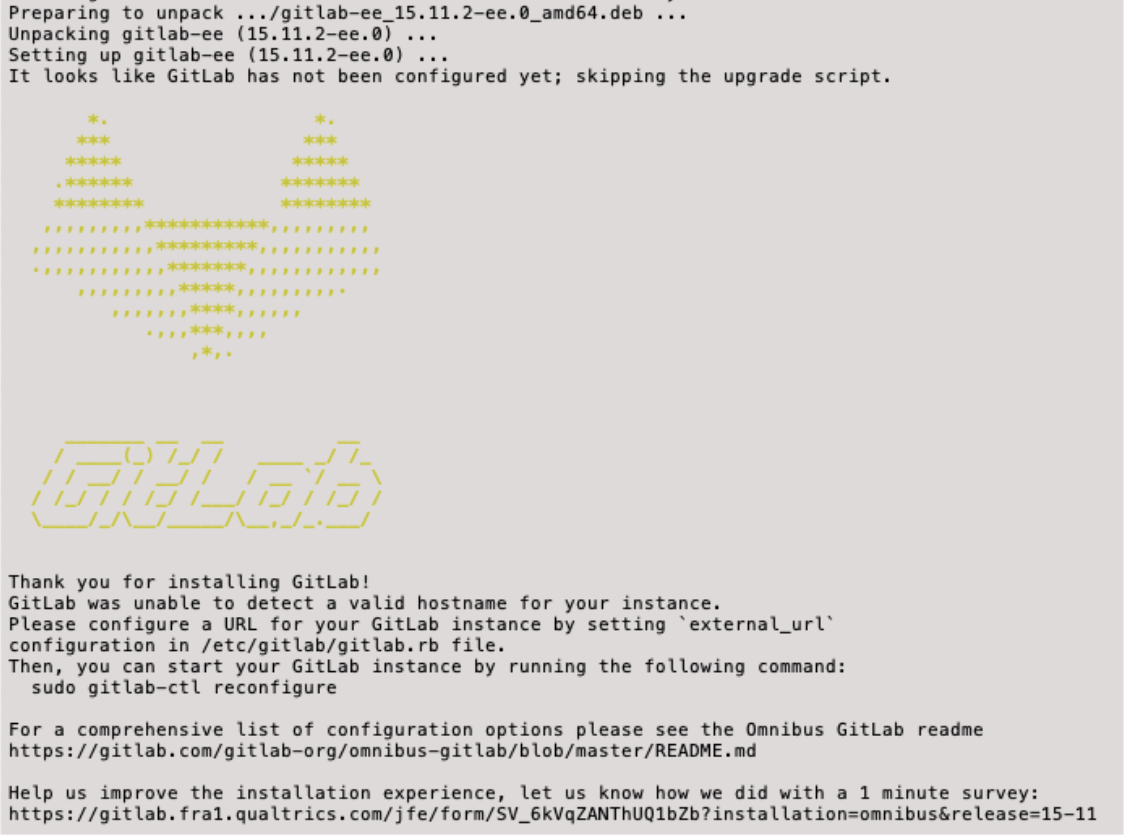
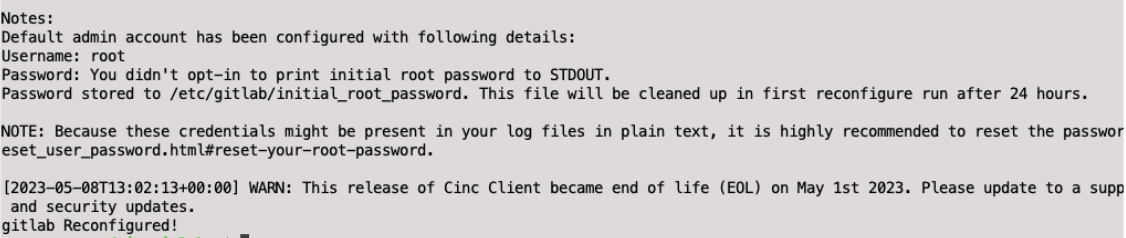
After installation, a password for the root user will be automatically generated and stored for 24 hours in /etc/gitlab/initial_root_password.
Please note! It is strongly recommended to change the password immediately after installation.
At this stage, we will configure and activate the firewall in your operating system, considering that Ubuntu 22.04 is used. If you already have access to the server, you can skip this step.
First, we need to grant access rights to the server:
1| sudo ufw allow http
2| sudo ufw allow https
3| sudo ufw allow OpenSSH
Turn on the brand firewall:
sudo ufw enable
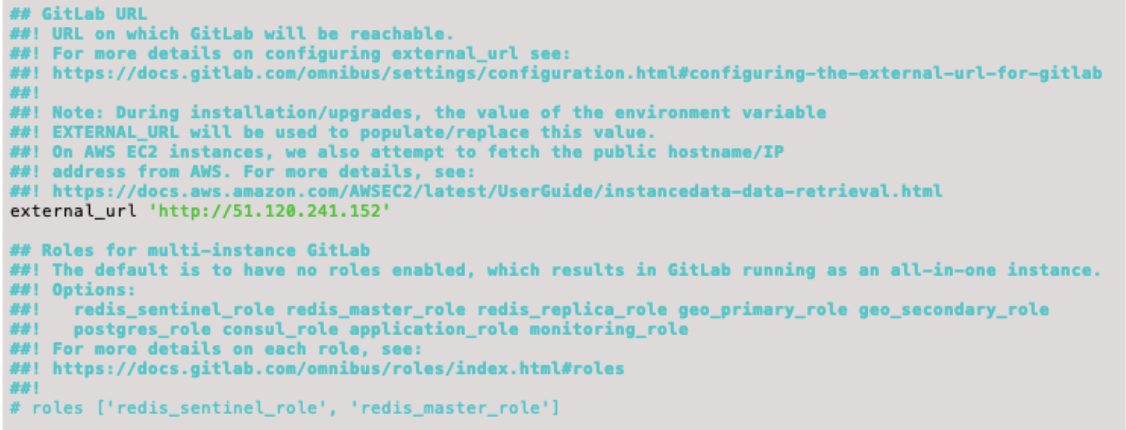
Now we open the GitLab configuration file for editing. The gitlab.rb configuration file is located at /etc/gitlab/gitlab/gitlab.rb:
sudo vim /etc/gitlab/gitlab.rb
or
sudo nano /etc/gitlab/gitlab.rb
You need to specify your IP on the next line:
external_url <‘http://51.120.241.152’>
sudo gitlab-ctl reconfigure
You must then wait for the next message, which may take some time:
After completing this reconfiguration procedure, go to your IP address and verify that GitLab is installed and working properly:
Then go back to the gitlab.rb configuration file and make the following changes, commenting out the necessary lines:
sudo vim /etc/gitlab/gitlab.rb
or
sudo nano /etc/gitlab/gitlab.rb
external_url — the domain of the server on which GitLab is installed, carefully check that it indicates https://
- letsencrypt[‘enable’]= true – use of the Let’s Encrypt certificate
- letsencrypt[‘contact_emails’] – I indicate the e-mail for registration
- Letsencrypt[‘auto_renew’]= true – auto-renewal of the Let’s Encrypt certificate
- Letsencrypt[‘auto_renew_hour’]= “12” I am indicating the year of renewal
- letsencrypt[‘auto_renew_minute’]= “30” I’m indicating the update dates
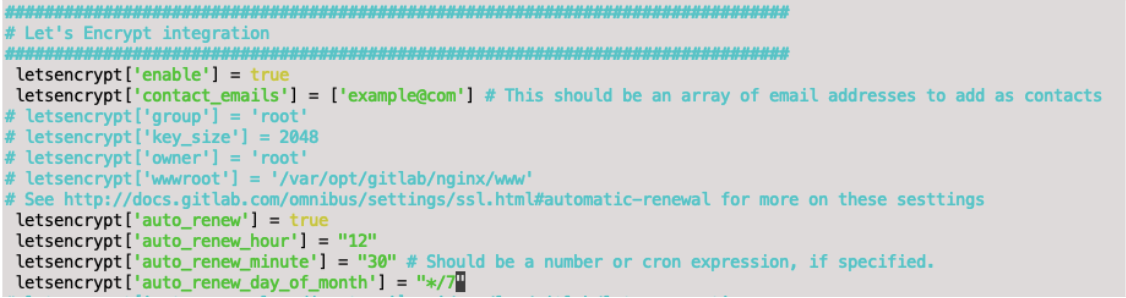
Make sure that the changes are in the gitlab.rb file looks like this, and note that the gitlab.rb file is quite large so that different changes may be far apart.
external_url ‘https://gitlab.example.com’
letsencrypt[‘enable’] = true
letsencrypt[‘contact_emails’] = [‘example@com’]
letsencrypt[‘auto_renew’] = true
letsencrypt[‘auto_renew_hour’] = “12”
letsencrypt[‘auto_renew_minute’] = “30”
letsencrypt[‘auto_renew_day_of_month’] = “*/7”
We save our changes and put them into effect:
sudo gitlab-ctl reconfigure
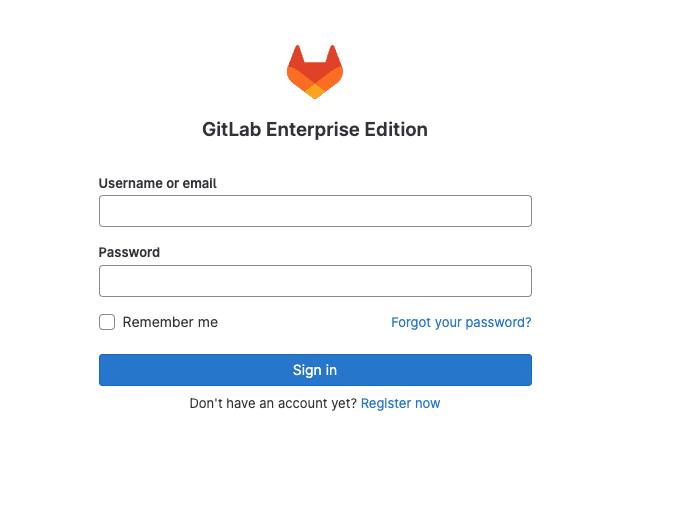
After receiving this message, which may require some waiting time, especially in case of a 502 error, you can log in to GitLab successfully.
The generated password can be found in the corresponding file from GitLab.
sudo cat /etc/gitlab/initial_root_password
We get the following output:

In the “Username or email” field, enter the user “root”, and in the “Password” field, enter the password that is located in the file “/etc/gitlab/initial_root_password”. After successful authorization, we can log in to our GitLab account.
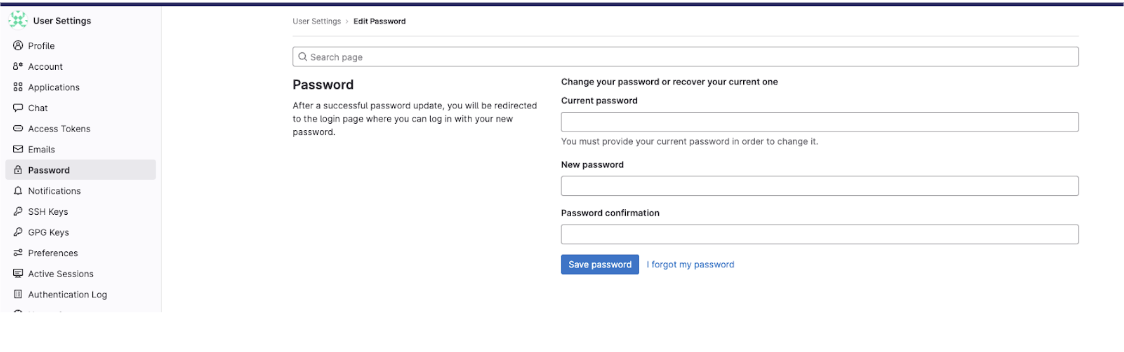
It is essential to change your password immediately! To do this, go to your profile by clicking on your avatar in the screen’s upper right corner.

Click <Edit profile -> Password>.
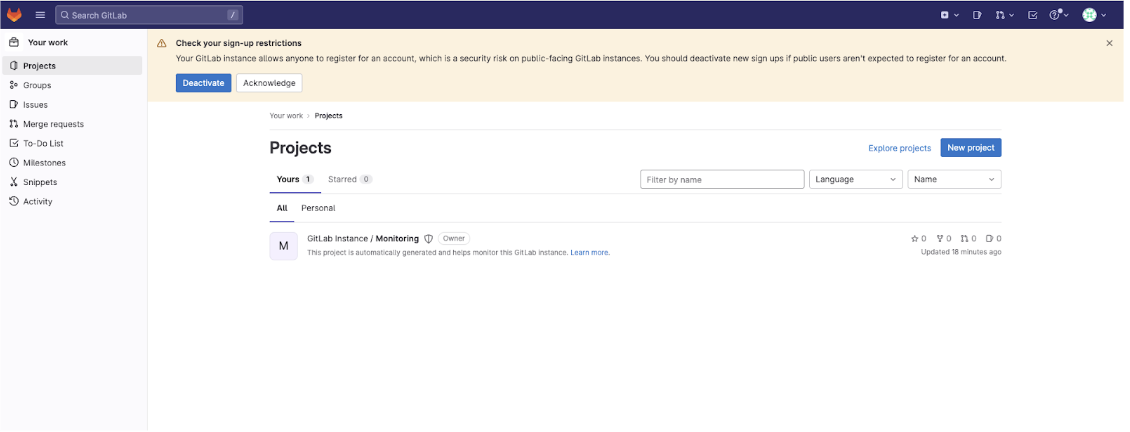
We completed the steps to install GitLab in the previous step. Now we will move on to additional settings. As you can see from the example, GitLab offers the option to disable the registration of new accounts for anyone who knows our domain. Anyone familiar with our domain can create an account (but the administrator will still need to approve the registration).

Uncheck the box:

You can also immediately set up a registration authorization with your organization:
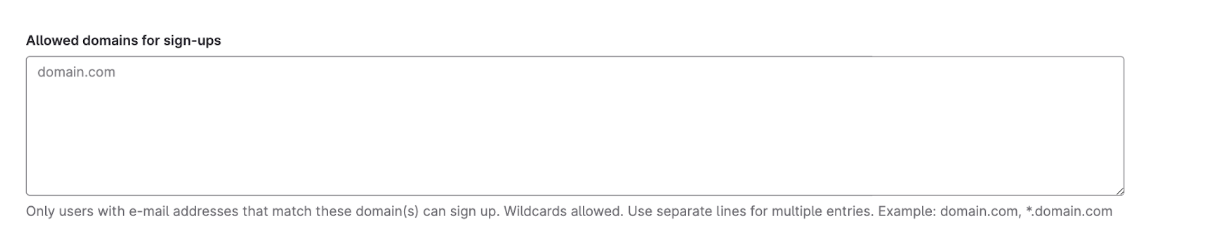
Click <Save changes>.
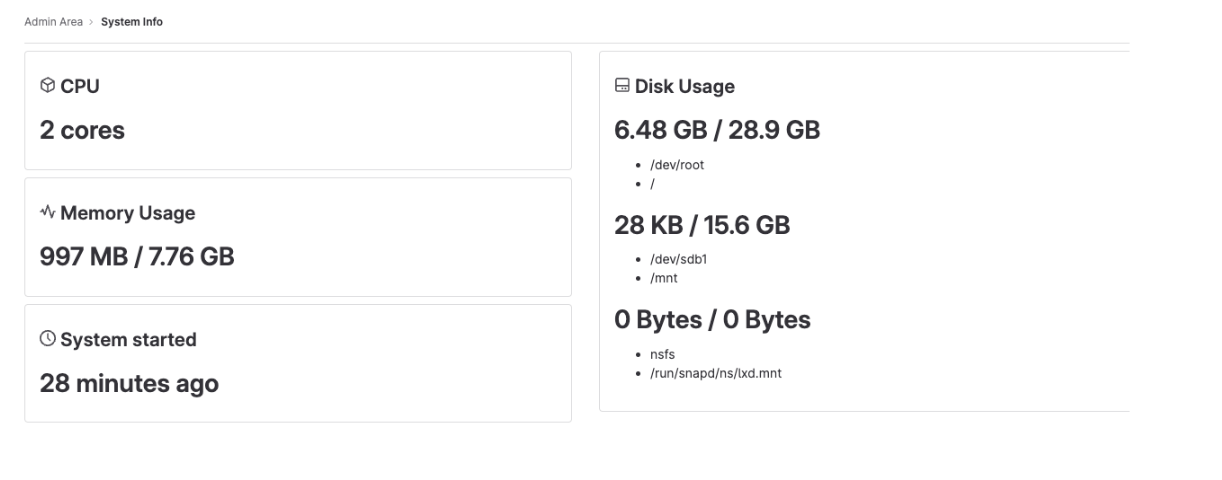
An empty GitLab consumes the following power:
Now you can use the convenient functionality of GitLab without any problems, you need to set up SMTP to receive notifications correctly, and you are ready to start building your workspace. Thus, you have completed the installation, which generally meets the needs of most companies.
Conclusion
As we choose between deploying a self-managed GitLab on cloud platforms such as GCP, AWS, and Azure, or using the SaaS version, the decision depends on the customer company, as the legal requirements of certain countries regarding the storage of projects in cloud environments are considered. However, if legal restrictions are not an obstacle, we use the SaaS version of GitLab.
This approach has several undeniable advantages:
- Reducing the cost of maintaining cloud infrastructure.
- Saving time and effort that is usually required to administer the system.
- No need for complex settings that are often time-consuming and costly.
- Automatic configuration of SMTP for notifications.
- Receiving updates and other user benefits during use.
However, there are more viable options than self-managed GitLab. It just requires more attention, effort, and resources to be effective. Self-managed GitLab can benefit companies with specific requirements, high-security standards, or the need for complete control over their data.
GitLab and Cloudfresh
Cloudfresh is a certified Consulting, Support, and Implementation GitLab partner. We empower organizations to get the most from GitLab solutions. With our help, hundreds of teams improve their SDLCs with our expertise. Check out our GitLab professional services.
Our GitLab Experts will advise, manage, and implement high-quality GitLab implementation services and technical support for GitLab migration services.
Use this link for a 30-day free trial for the GitLab self-managed licenses, professional onboarding, consultations, expertise, and technical support from Cloudfresh.
Let’s accelerate your DevSecOps transformation together!